
![How to Homebrew Switch in 2023? [Switchbrew]](https://techthanos.com/wp-content/uploads/2023/05/How-to-Homebrew-Switch-in-2023-Switchbrew.jpg)
Do you want to unlock the full potential of your Nintendo Switch Console? Change the firmware of your Switch console using the Homebrew methods used by many. The Switchbrew method provided in this article has been used by many and has shown results. Get into this article and learn How to Switch Homebrew with the procedures here.
CAUTION: Once you do changes to Firmware on your Switch console it will be impossible to turn it back to its factory defaults.
Table of Contents
What is Nintendo Switch Homebrew?
Homebrew on Nintendo Switch is software or firmware that is unauthorized by the developers of Nintendo. Homebrew included customer tools, games, emulators, applications, and more that are not normally available on Nintendo Switch. You can use your custom firmware on Nintendo Switch devices that are released before July 2018 or with firmware version 4.1.0.
Is it Safe to Homebrew Switch?
If you do a Switch Homebrew, then it will be not possible to get the Online Services offered by Nintendo. You might even be banned by Nintendo for doing so. It is better to buy a new Nintendo Switch V1 than try to hack your new Switch devices because it is difficult to find the correct mod chip and is expensive.
If you have what it takes, then I am not stopping you. Continue on to find the procedure to Homebrew your Nintendo Switch or Nintendo Switch Lite console.
How to Homebrew Nintendo Switch?
To get your new Firmware on your Nintendo Switch console, you have to make sure that your device is not patched. After that, you can download the required Homebrew files and boot them into your Switch Console. By using the Tegra TCM, cross-platform exploit, you can easily get Homebrew your Nintendo Switch. Now all that takes is just a restart of your Switch and you have now access to a free Nintendo Switch console.
How to Check for Patched Nintendo Switch?
- Get the Serial Number for your Nintendo Switch from its backside
or
- Go to your Nintendo Switch System Settings menu.
- Select the System option and go to the Serial Information option.

- Here you can find your console’s Serial Number.
- Now visit the ismyswitchpatched.com site on your Phone or PC web browser.
- Enter your Consoles Serial Number here and wait for the results.
Your switch console is not patched if green color appears. but if it is any other color then you have to give up on the homebrew process.
Requirements to Homebrew Switch
Hardware
- PC with Internet Connection
- Nintendo Switch
- An RCM Jig to enter Recovery Mode on Nintendo Switch, without damaging your console.

- USB-C to USB-A wire
- Micro SD Card
- SD Card Adapter
Software Required
SD Setup
- Go to sdsetup.com/console?switch site.
- Under Pre-configured Budles choose Recommended Default option and tap on Select.
- Scroll down and click on Download your ZIP.
Atmosphere
- Visit github.com/Atmosphere-NX/Atmosphere/releases on your PC browser.
- Now download the latest Atmosphere ZIP file
Hekate
- Use the link github.com/CTCaer/hekate/releases.
- Select the hekate ZIP file link and downloaded it on your PC
TegraRcm
- Go to github.com/eliboa/TegraRcmGUI/releases
- Select the TegraRcm Installer ZIP file and download it.
You may also like to learn about How to Fix Crunchyroll Not Working on Switch?
Switch Homebrew / Switchbrew Procedure
Move Required Files to SD Card
- Connect your SD card to your PC using the Adapter.
- Go to This PC section, right-click on your SD card, and select Format to delete any old files on it.
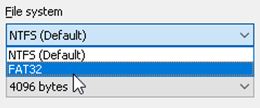
- Again right-click on the SD card and select Format.
- Choose FAT32 as your file system and tap on Apply.
- Now extract the ZIP files from Atmosphere, Hekate, and TegraRcm.
- Move all the extracted files of Atmosphere and TegraRcm to your SD card.
- From Hekate, you just need to move the bootloader to your SD card.
- Wait for the files to get transferred to your SD card
- Get back to This PC section, right-click on your SD card, and select Eject.
Setting up TegraRcm
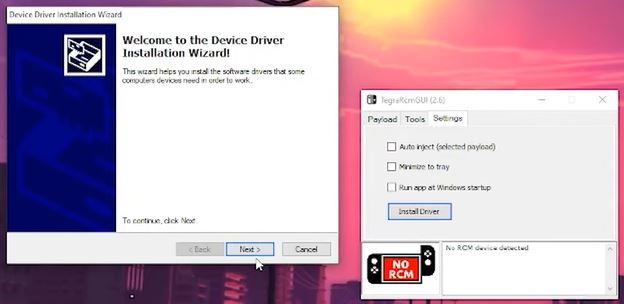
- Launch TegraRcm on your PC
- Go to Settings, select Install Driver, and press tap on Yes and complete the installation process.
- Take your Switch Console and remove the Joy-con
- Plug in your RCM jig to your console’s right side.
- Connect your Switch Console with the USB-C to USB-A wire.
- Now press both the volume and hour button at the same time and plug the USB wire into your PC.
- Your Switch Console will be detected by TegraRcm on your PC.
- On TegraRcm select the Folder icon and choose the hekate_ctcaer.bin file.
- Select the Plus button and select Fusee
- Now tap on Inject Payload option.
NOTE: If it is not working, you might need to try it again twice or thrice, till the payload is successful.
- Now restart your Nintendo Switch Lite console.
Testing Homebrew Switch
- From the menu that appears on your Switch screen select Launch.
- Now click on the first option and you will get a black screen on your Switch.
- After a few seconds, you can see the Nintendo Switch logo
- Get to Album on your Switch console to get the Homebrew menu.
NOTE: If you get any errors when accessing Homebrew on the Nintendo Switch console you can try to copy paste the hekate bin file once again to the SD card and try the process again.
With the following steps, you have now successfully got your Switch Homebrew. Now you can play all of your favorite games, install applications and access more features on your Switch console.
You may also like to learn about How to Get & Use Kodi on Switch?
Suggestions
Check the GitHub pages of the software you used to Switchbrew for the latest version and updates. If you want to update the Switch Homebrew firmware on your console, you need to repeat the process with the latest version. If you have any doubts regarding the process, you can contact me through the comment section and I can help you with it.