

The introduction of VR headsets has been giving new ways of fun and entertainment. Meta has been producing the Oculus Quest 2 VR headsets to enter into Virtual Worlds. Most of Oculus Quest 2 usage is on VR games, but you can also access other files on it. With a File Explorer on Mets Quest, you can access all the files available on it. Know the steps on How to make it possible with the contents of this article.
Table of Contents
Can I use File Explorer on Oculus Quest 2?
You can watch videos, pictures, and texts on your Meta Quest headsets Storage very easily by accessing the Files app. If you want to access your Windows PC and Cloud Storage files on Oculus Quest 2, it is better to use Cx File Explorer. To know more about the procedures to access File Explore on Oculus Quest 2, continue to read this article.
How to use File Explore on Oculus Quest 2?

To access the files available in your Oculus Quest 2 VR headset’s internal storage, the File app on it can be used. Most of the files available on this Meta Quest headset would be screenshots and videos. Other than that, you can also access File Types like,
- .MP4, .MOV, .M4V, and .MPG
- .PNG and .JPG
- .DOC, .DOCX, and .TXT
- .KEY, .PPT, .PPS, and .PPTX
You can use this application to access, manage, share, browse and organize the files available in your VR headset.
Open File Explorer on Meta Quest:

To open the Files App/ File Manager/File Explorer on Oculus Quest 2, the steps to be followed are as follows,
- Hold on to your Touch or Touch Pro Controller and press the required button to open Universal Menu.
- Now go to the apps panel and choose Files to open the File app or the File Explorer app on Meta Quest.
You can now make use of this File Explorer application on your Oculus Quest 2 VR headset to share and delete files. The simple steps to do these functions are as follows,
Share Files on Meta Quest:
- Get into the File App and select the vertical three dots icon on the file you want to share.
- Now select the place you want to share the file from your VR headset.
You can share it on places like Facebook News Feed, Groups, and Messenger.
Delete Files on Oculus Quest 2:
- Open the file app and tap on the same vertical three dots icon on the file you want to delete.
- From the options shown, select Delete and select Delete again to confirm the selection.
You can also delete it completely from both headset and Meta Quest mobile app by selecting Delete and Unsync options.
How to Get Cx File Explorer on Oculus Quest 2?
The steps to get the Cx File Explorer application on your Oculus Quest 2 VR headset might seem long, but it’s actually a simple process, and if you follow through the steps given here, you can easily access it. To get Cx File Explorer on Oculus Quest 2 headset, the simple steps to follow are,
- Register to SideQuest VR and Install its application on your PC.
- Download the Cx File Explorer apk from the official site and get it on your VR headset using SideQuest.
Get SideQuest VR on PC:
![]()
The SideQuest VR application is available for all Windows, macOS, Linux, and Android users. You can easily download the application on your PC by following the steps provided here.
- Go to SideQuest VR’s official site.
- On the home page, you can find Easy Installer and Advanced Installer.

- Choose Advanced Installer and download the latest version and install it on your PC.
- After installation, you can use your e-mail or accounts like Google, Discord, and GitHub to create an account on SideQuest VR.
Get Cx File Explorer on Oculus Quest 2:

After you get the SideQuest VR app on your Meta Quest, it’s time to add Cx File Explorer to your Meta Quest VR headset. You can download the Cx File Explorer APK file on your PC from its official website and install it on Oculus Quest 2 using SideQuest VR.
This is possible only if your Meta Quest VR is connectable to your PC. If the ports are not matching, you can always use adaptors to move over this error. The steps to get Cx File Explorer on Meta Quest are as follows,
- Get into Cx File Explorer official site and download the APK file on your PC and note down its file path.
- Connect your Oculus Quest 2 VR headset to your PC.
- Open the SideQuest VR application and can find the Not Detected message.
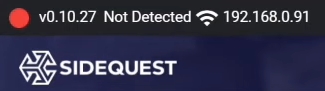
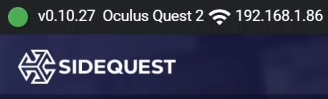
- Give allow your Meta Quest headset to let SideQuest VR recognize it.
- Go back to your PC and select the “Install APK file folder from your Computer” icon.

- Choose Cx File Explorer APK to Open and get it installed onto your Oculus Quest 2 VR headset.
- Make sure to check for “No tasks running…” before connecting your VR headset from your PC.

You can now access Cx File Explorer on your Oculus Quest 2 VR headset.
The End
You can now access files from both local and cloud platforms on your Oculus Guest 2 with the help of the Cx File Explorer application. You can use the same procedure to use your Android devices to get the Cx File Explorer app on your Meta Quest VR headset.
It has features like Analyze to find information on storage usage on yoru VR headset. There are also other view options you can change to the way you want. You can use the default Files app on the Cx File Explorer application app on your Oculus Quest 2 VR headset.
Frequently Asked Questions:
Is Malware on Cx File Explorer?
The Cx File Explorer Application is free of any kind of Malware or Spyware.
What are the best Games to play on Oculus Quest 2?
Beat Saber, Population: ONE, Resident Evil, and Echo Combat are some of the best games to play on your Oculus Quest 2 VR headset.